
Fix: Can’t Enable Boot Logging in Process Monitor on Windows 10

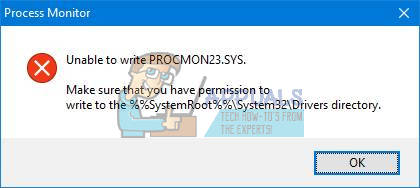
Process Monitor is an advanced monitoring tool for Windows users that is capable of monitoring file system, Registry and process/thread activity, all in real-time. Process Monitor is a lightweight yet brilliant little program that has some extremely handy features, including Boot Logging – enabling which allows Process Monitor to generate thread profiling events that capture the state of all running applications at a regular interval. Unfortunately, many Windows 10 users have reported being unable to enable Process Monitor’s Boot Logging feature even though it worked perfectly for them on older versions of the Windows Operating System. When a Windows 10 user affected by this issue tries to enable Boot Logging, they see an error message that states:
“Unable to write PROCMON23.SYS. Make sure that you have permission to write to the %%SystemRoot%%\System32\Drivers directory.”
PRO TIP: If the issue is with your computer or a laptop/notebook you should try using Reimage Plus which can scan the repositories and replace corrupt and missing files. This works in most cases, where the issue is originated due to a system corruption. You can download Reimage by Clicking Here
The error message doesn’t provide affected users with a lot of information, only that Process Monitor was unable to create or write to a file named PROCMON23.sys and that the cause may be the user not having permission to write to the directory in which this file is located or is supposed to be located. In actuality, Windows 10 already has a file titled PROCMON23.sys in the same directory, so when Process Monitor tries to create the file in that very directory, it fails and consequently displays the error message described above. This issue has been confirmed to affect all currently available builds of Windows 10, which makes it all the more significant. Thankfully, though, this problem can be fixed pretty easily – all you need to do is:
  1. Press the Windows Logo key + R to open a Run
  2. Type the following into the Run dialog and press Enter:
%SystemRoot%\System32\Drivers\
  1. In the File Explorer window that opens up next, locate a file named sys, right-click on it and click on Rename.
  2. Rename the file to PROCMON23_old.sys and press Enter to save the name.
  3. If you are asked to confirm the action or provide your password to give the administrative action the go-ahead, do whatever is asked of you. If you are not asked to confirm the action or provide authentication, simply skip this step.
  4. Restart your computer.
  5. When the computer boots up, launch Process Monitor, click on Options > Enable Boot Logging and click on OK in the resulting popup, and Process Monitor should be able to successfully enable Boot Logging this time.

Comments

Popular posts from this blog

Fix: System Found Unauthorized Changes on the Firmware, Operating System or UEFI Drivers

Several users are struggling with the  System found unauthorized changes on the firmware error  at every startup or when trying to take their computer out of hibernation mode. Most affected users report that the issue started occurring after they installed some pending Windows updates. The issue is mostly encountered on Windows 7. The system found unauthorized changes on the firmware, operating system or UEFI drivers. Press [OK] to run the next boot device, or enter directly to BIOS Setup if there are no other boot devices installed. What is causing the System found unauthorized changes on the firmware error We investigated this particular issue by looking at various user reports. This error will occur whenever your system is checking the firmware one some computer hardware parts as part of a new security feature. To be precise, the error is occurring because not all Windows versions will support this new security feature. As it turns out, there are sev...

Fix: The Following Error Occurred Attempting to Join the Domain

Several users are getting the ‘ following error occurred attempting to join the domain ‘ error when trying to connect a computer to a home or work domain. Most of the time, the error is accompanied by an explanation message telling the user that it has exceeded the maximum number of computer accounts. The issue is not restricted to computers that connect to a domain for the first time, as it’s often reported to occur with PCs and laptops previously connected to the same domain. The following error occurred attempting to join the domain. Your computer could not be joined to the domain. What is causing the ‘following error occurred attempting to join the domain’ error? We investigated this particular error by looking at various user reports and the troubleshooting guides that they themselves followed to get the issue resolved. Based on what we were able to gather, there are several different scenarios that might trigger this particular error message: SMB1 support is di...

How to Fix Startup Repair Loop on Windows 7

Getting a  boot loop  which doesn’t let you go past the  Startup Repair  in Windows 7 is something that a lot of users have experienced, and it is most likely due to corrupt registry entries. It might be your mistake if you have messed around in the registry and changed a key you shouldn’t have, but it can also happen by itself, as Windows isn’t really immune to that kind of problems. No matter whether it is your fault or not, you will not be able to boot up Windows, as it will be stuck rebooting itself and won’t make it past the  Startup Repair  screen no matter what. However, there is a solution that begins at the Startup Repair screen, and uses the command prompt to fix the problem by backing up your files, and refreshing Windows, so follow the steps below to see how you can get out of the boot loop. Backup your old files and refresh your Windows In order to start the system in start-up repair, you will need either the windows installation ...