There are a lot of antivirus tools available online but none of them can be called perfect and there will always be malicious tools that will be able to slip by unnoticed by even the most expensive and most popular antivirus tools.
There also exists another side of the medal and those are the false positives which are constantly reported by your antivirus tools even though the files are 100% legitimate. However, the judgment on whether a file is genuine or not is definitely delicate to say the list and you should always pay close attention when handling these files.
These files should be scanned by several different antivirus scanners before you decide the file is a false positive. The error code which sometimes appears under the message displayed in the title is actually produced by Windows which makes it all the more interesting. Follow the instructions presented below in order to learn just how to handle this error.
Solution 1: Disable Windows Defender Temporarily
Since Windows Defender can really produce some false positives when its settings are set to full protection, it’s normal to expect simple mistakes like this one. However, when it comes to Windows and Windows Defender, there is no efficient way of actually running the file which was reported until you disable Windows Defender completely.
Make sure you turn it on as soon as possible as it’s always dangerous to leave your computer unprotected for a long time.
- Right-click on the shield icon on your taskbar and click on Open.
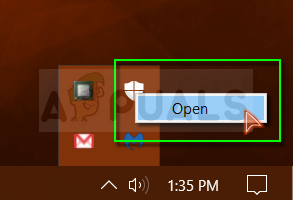
- When Windows Defender Security Center opens, click on the shield icon below the home button, open Virus & threat protection settings and turn off Real-time protection and Cloud-based protection.
- Navigate to the browser icon (second from the end) and turn off the Check apps and files option.
- You can also disable SmartScreen if you think it’s going to bother you during the action you wish to undertake.
Note: Don’t forget to turn on everything you just disabled by repeating the same process and turning the components ON.
Solution 2: Add an Exception for the Folder Where the File Is Located
If you are using several security tools besides Windows Defender, you should know that disabling one of them will cause the other to start acting up. Luckily, there is a simple solution which simply consists of adding an exception for the file you are trying to run. If the file is located on a removable storage device, make sure the device is connected before you open your antivirus screen.
Follow the steps below in order to do so:
- Open your antivirus user interface by double-clicking on its icon on the Desktop or by double-clicking on its icon in the bottom right part of your taskbar.
- The Exception setting is located in different places according to different antivirus tools. It can often be found simply without much hassle but here are some location on the most popular antivirus tools:
Kaspersky Internet Security: Home >> Settings >> Additional >> Threats and Exclusions >> Exclusions >> Specify Trusted Applications >> Add.
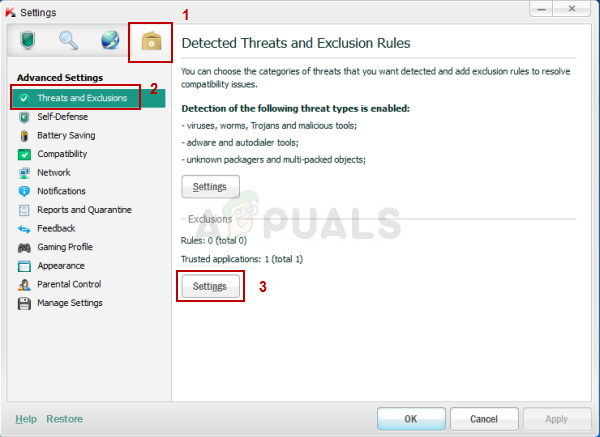
AVG: Home >> Settings >> Components >> Web Shield >> Exceptions.
Avast: Home >> Settings >> General >> Exclusions
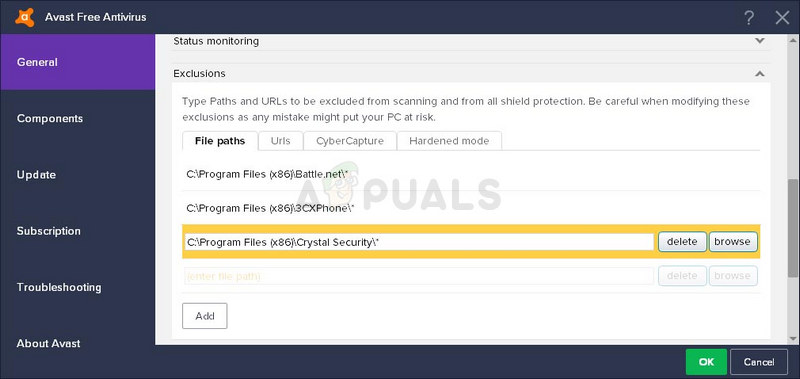
In each case, make sure you choose the folder location properly. Also, don’t click the file directly because most users claimed that you actually need to select the folder and not the file you want to add to exceptions.
Solution 3: Problems with Windows Explorer
It definitely sounds weird but sometimes even the Windows Explorer process gets flagged as potential malware and it prevents you from using your computer properly while displaying the “Operation did not complete successfully because the file contains a virus“ error. Since explorer.exe is a genuine Windows process, you may not be able to solve the problem by disabling antivirus or by adding explorer.exe to exceptions. Luckily, there is an even easier method:
- Search for “Command Prompt”, right-click on it, and select the “Run as administrator” option. Copy and paste the following commands and make sure you click Enter after each one.
sfc /SCANFILE=c:\windows\explorer.exe
sfc /SCANFILE=C:\Windows\SysWow64\explorer.exe
sfc /SCANFILE=C:\Windows\SysWow64\explorer.exe
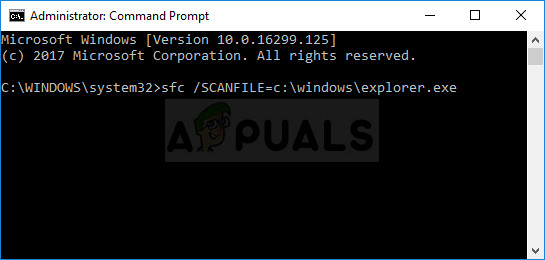
- If everything goes as it should, you should receive a message which should along the line:
Windows Resource Protection found corrupt files and successfully repaired them.
- Even if this message doesn’t appear, the problem might still be resolved so make sure you restart your computer afterwards and check to see if the issue still appears.
Solution 4: Problem with Windows Backup
This error can also appear when running Windows Backup and the error is displayed when Backup runs into the problematic file. If you have followed the instructions above and scanned your computer several times and if you are 100% sure you are not infected, the false positive may be caused by temporary Internet and cache files.
These files should be deleted on all browsers you are using before you proceed with running the Windows backup again. Follow the instructions below in order to clear browsing data for Internet Explorer and Edge at the same time.
- Type “Control Panel” in the search bar located at the taskbar and click on the first result.
- Change the View by option to large icons and locate the Internet Options section. Open it.
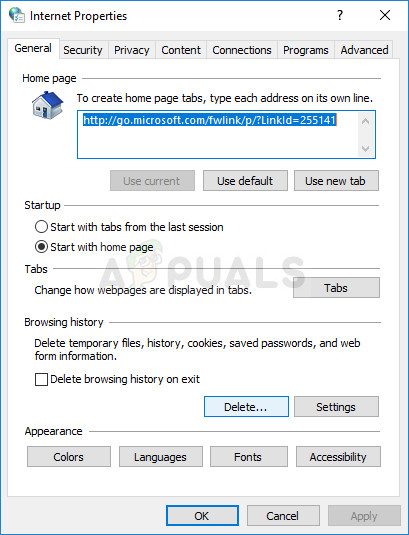
- Stay under the General tab and look under the Browsing history section.
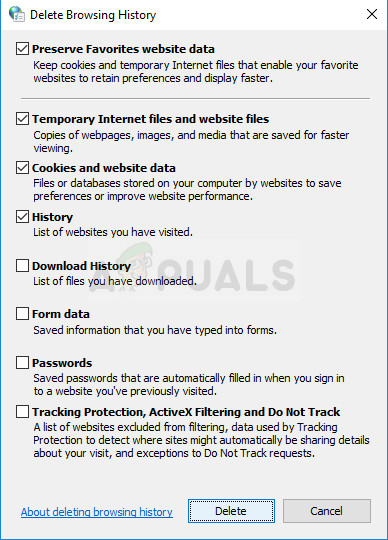
- Click on Delete… and choose what you want to delete from your browser.
- We recommend you uncheck the first option called “Preserve Favorites website data” and check the next three; “Temporary Internet files and website files”, “Cookies and website data”, and “History”.
- Click on Delete and exit Control Panel.
- Reboot your computer and check to see if the annoying pop-up still appears.
- Open your Edge browser by either clicking its icon at the taskbar or by searching for it in the Start menu.
- After the browser opens, click on the three horizontal dots located at the top right part of the browser and select Settings.
- Under Clear Browsing Data section, click on Choose What To Clear.
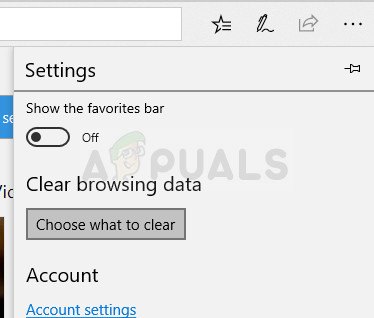
- Keep the first four options checked and clear this data.
- The problem should gone in no time.
Comments
Post a Comment