Getting a boot loop which doesn’t let you go past the Startup Repair in Windows 7 is something that a lot of users have experienced, and it is most likely due to corrupt registry entries. It might be your mistake if you have messed around in the registry and changed a key you shouldn’t have, but it can also happen by itself, as Windows isn’t really immune to that kind of problems.
No matter whether it is your fault or not, you will not be able to boot up Windows, as it will be stuck rebooting itself and won’t make it past the Startup Repair screen no matter what. However, there is a solution that begins at the Startup Repair screen, and uses the command prompt to fix the problem by backing up your files, and refreshing Windows, so follow the steps below to see how you can get out of the boot loop.
Backup your old files and refresh your Windows
In order to start the system in start-up repair, you will need either the windows installation media that came with your system or a system recovery disk if you have. If you do not have these, then you can buy it from the manufacturer or create one using a different computer using steps here
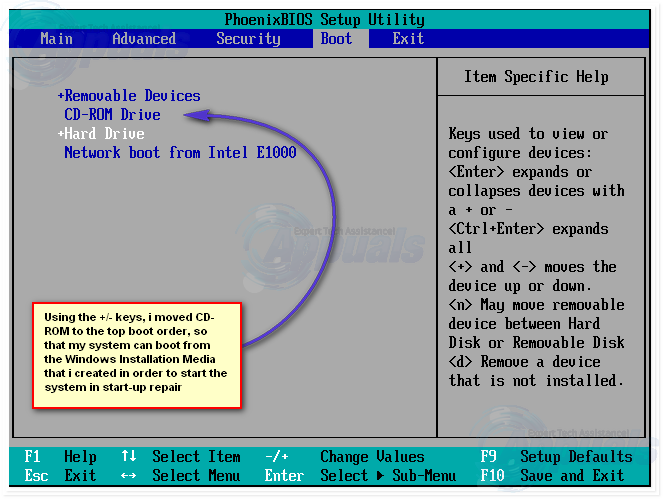
How to BOOT into BIOS to change Boot Order
You must know how to boot and change boot order since this will be needed to perform the solutions below.Restart your computer. Enter your computer’s BIOS (or UEFI) settings as soon as it starts up. The key that you need to press to enter these settings depends on the manufacturer of your computer’s motherboard and can be anything from Esc, Delete or F2 to F8, F10 or F12, usually F2. This is displayed on the post screen, and the manual that was supplied with your system. A quick google search asking “how to enter bios” followed by model number will also list results. Navigate to the Boot.
How to perform a Startup Repair using Windows 7 installation media
Insert the Windows 7 installation disc or USB into the affected computer and restart
As soon as the computer starts booting up, get into its BIOS settings (the instructions for which vary depending on the manufacturer of the computer’s motherboard) and configure the computer’s boot order to boot from the installation media instead of the hard drive. On most systems, it is the F2 key that needs to be pressed when the first screen appears. The key to enter bios is also displayed on the first screen that appears just for a few seconds. Save the changes once done and exit the BIOS settings.
when it says, press any key to boot from the installation media, press any of the keys on the keyboard.

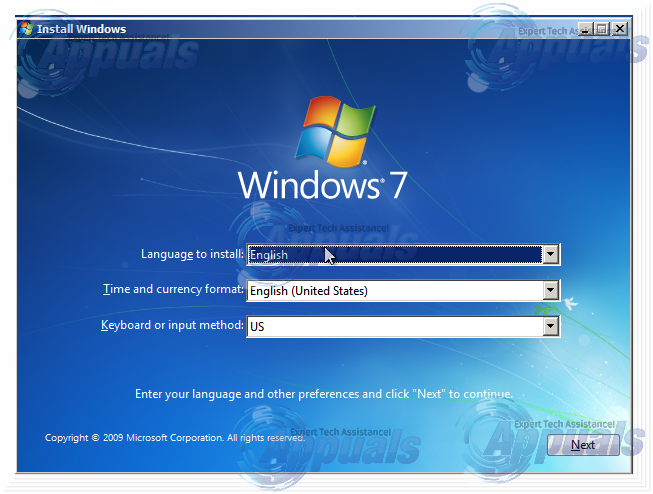
Choose your language settings and other preferences and then click on Next.
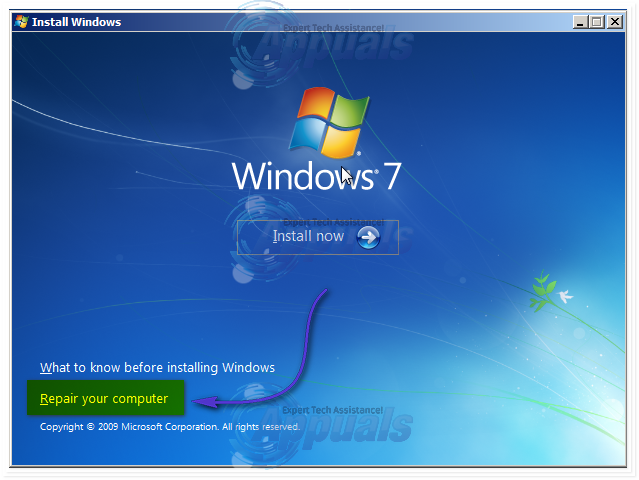
When you reach a window that has an Install now button at its very center, click on Repair your computer in the bottom left of the window.
Select the Operating System you want to repair.
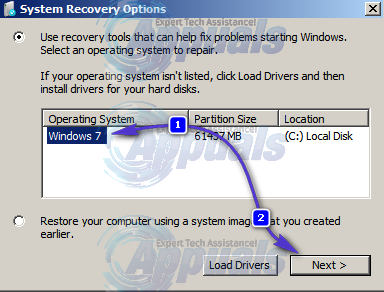
If Windows 7 is your only Operating System, only it will be displayed in the list. At the System Recovery Options window, click on Startup Repair. This brings you back to the main System Recovery Options Click Command Prompt.
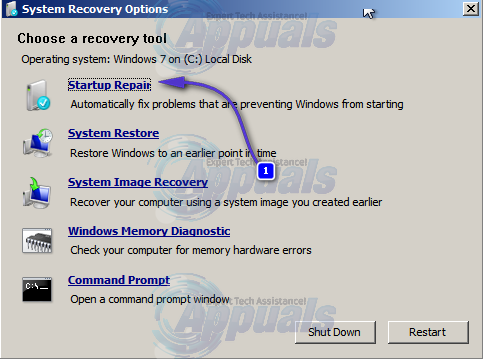
After clicking on it, Command Prompt will open to X:, an internal memory that uses the system recovery.
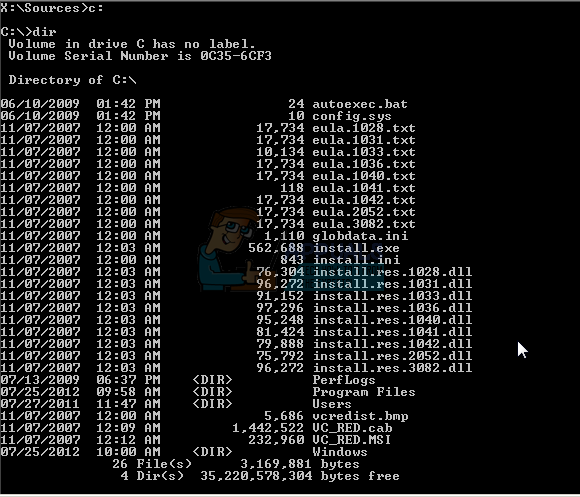
If your main drive is C: type C:, otherwise type in the letter of the drive or partition where Windows is intalled and press Enter.
Type in DIR and press Enter to verify the disk drive. If you see Program Files, Users and Windows folders, you know that this is your main drive. If that is not your main drive repeat the first steps and type in the appropriate drive.
After locating your Windows system drive, type in CD \windows\system32\config and hit Enter to execute.
Type in DIR and press Enter, and see if the following folders are contained in your drive: RegBack, DEFAULT, SAM, SECURITY, SOFTWARE, SYSTEM.
Type in MD mybackup and press Enter to make a backup folder, in case something goes wrong.
Type in copy *.*mybackup and press Enter. Press A if asked to overwrite the existing file.
At this point, you need to check if you can use Windows’ automatic backups to restore the registry. Type CD RegBack and press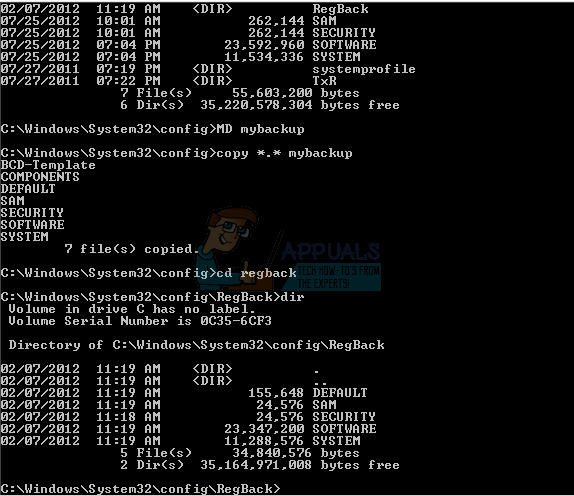
Type DIR, and verify that you have the folders mentioned above. Note that all folders should have a certain size that IS NOT 0 bytes. If any of the folders is 0 bytes, that means that there’s an empty registry hive, and Windows can’t function with it, meaning you will need an alternative solution.
Again, type in copy *.* .. and hit Enter to copy the backup files to the \Windows\System32\config folder.
If your computer says to overwrite existing files, hit A to allow.
Next type in exit and hit Enter to close the command prompt.
Restart your PC.
Once you’re done with this, you should be out of the boot loop and able to use Windows again. This is a weird error that happens every once in a while for users of Windows 7, but if you just follow the aforementioned steps, you will get rid of it in no time.
Comments
Post a Comment