Performing a System Restore is sometimes the best solution for several problems which might occur on your Windows PC and this method is often suggested as soon as something goes wrong with your computer as it can restore your PC to a state where it was before the error started occurring.
However, sometimes when users proceed to run the System Restore process, the tool won’t start at all and it displays the following error message, or it may halt in the middle of the restoration process.
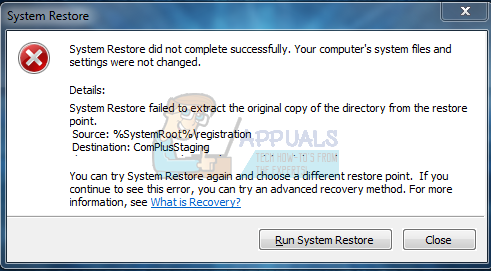
“System Restore did not complete successfully.”
There are several reasons for why this error occurs and, subsequently, there are plenty of possible solutions for it. The error is often associated with Windows 10 but it can also appear on older versions of Windows OS. Follow the solutions below in order to find out what to do when this error strikes your PC.
Solution 1: Disable AntiVirus & Create a Test File
- Disable your Antivirus (many users reported) issues with Kaspersky and aVast and reboot the PC. Create a new restore point “test”. Now, create a test file (in a notepad) or word and save it.
- Now open System Restore and choose “Choose a different restore point” option and then chose the restore point you want to restore to.
Solution 2: Try Running the System Restore in Safe Mode
If you are using Windows 10 do the following:
- Click on Start button (1). Hold down SHIFT KEY+Click On Power (2) then click on Restart(3)
- The PC will reboot and get into the Recovery Environment
- Click on Trouble Shoot->Advanced Options->System Restore.
If this fails, proceed with the steps below:
Starting your computer in Safe Mode is sometimes the best solution for your computer as it boots your computer using only the minimal set of drivers and programs needed to boot your computer properly. Follow the info below in order to achieve this.
- Reboot your computer and wait for the boot screen to appear. It’s usually the screen with your PC’s manufacturer with the options such as “Press _ to Run Setup”.
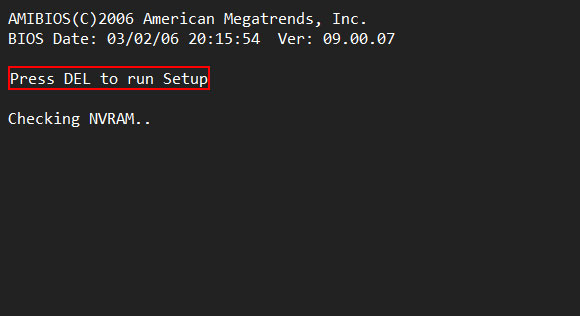
- As soon as that screen appears, start pressing the required key on your keyboard. If the key doesn’t work, reboot your computer again and start pressing the some of the function keys (F12, F5, F8…).
- The Windows Advanced Options Menu should open, enabling you to choose several options to boot your computer.

- Boot into Safe Mode with Networking.
If you are using Windows 8 or 10, then follow the procedure here to get into Safe Mode: Windows 10 Safe Mode
Alternative:
You can also boot in Safe Mode using only msconfig (System Configuration). Follow the instructions below.
- Click on either Start menu or the search bar next to it and type “msconfig”. Click on the first result which should be named System Configuration and wait for the settings to appear. You can also type it in the Run dialog box.

- Under the Boot tab, check the Boot options section and check the box next to the Safe boot option. This will enable you to choose between several radio buttons. Choose the last one called Network.
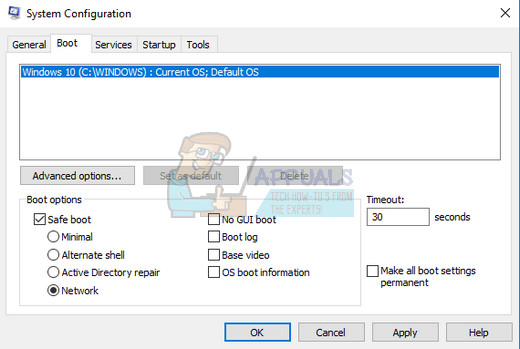
- Restart your computer in order to boot into Safe Mode. After you are done with System Restore, reopen System Configuration and undo these changes.
After you are booted into Safe Mode, do the following:
After booting into Safe Mode do the following:
- Hold the Windows Key and Press R
- Type rstrui.exe and Click OK
- Choose “Show More Restore Points” and then choose the restore point you want to restore to.
Solution 3: Uninstall Your Antivirus Software
It appears that several notable antivirus programs are causing these issues with the System Restore service and users have reported that programs such as Norton, Kaspersky Anti-Virus or ZoneAlarm have caused System Restore to malfunction.
Your best solution is to simply uninstall these programs, run the System Restore tool and reinstall them once you have successfully gone through the process.
- Disable your antivirus.
- The process for each antivirus is different. However, if you are a Windows 10 user, you also need to disable Windows Defender or Security Suite.
- Right-click on the shield icon on your taskbar and click on Open.

- When Windows Defender Security Center opens, click on the shield icon below the home button, open Virus & threat protection settings and turn off Real-time protection and Cloud-based protection.
- Navigate to the browser icon (second from the end) and turn off the Check apps and files option.
Comments
Post a Comment