Windows 10 brings with it a ton of cool features that are specifically designed for the comfort and ease of domain administrators all over the world. With Windows 10, domain administrators can make a wide variety of changes to every single one of the computers on their domain by simply making the changes they want to their own computer. One of the aspects that domain administrators can control for their entire network is the Start Menu of every single computer connected to the network.
Using Group Policy, domain administrators can create a special Start Menu layout that is applied to all the computers of all the users on the domain and provides the administrator with the ability to control what applications are pinned onto the Start Menu, the arrangement of the Menu tiles and the size of the Menu tiles. This option is exclusively available on the Education and Enterprise versions of Windows 10 and, once enabled, takes away the domain’s other users’ ability to tinker around with and edit the Start Menu and the apps and tiles on it in any way.
The following is everything you need to do to create a customized Start Menu layout for your entire domain using Group Policy:
Customize the Start Menu on your computer and give it the layout that you want applied to all of the computers on your network. This includes pinning and unpinning applications from the Start Menu, rearranging tiles, resizing tiles and creating app groups.
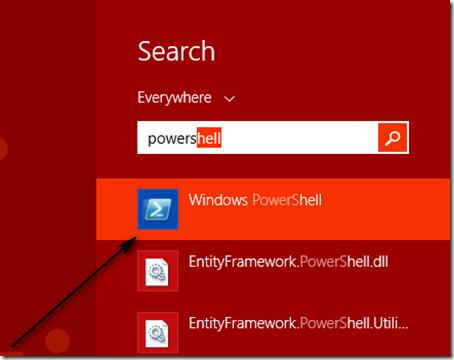
Next, export the Start Menu layout that you have created to an .xml file so that you can move it a storage space that is shared by all of the computers on your network. To do so, first open the Start Menu, type in powershelland open the program named Windows PowerShell.
In the Command Prompt, type in the command export-startlayout –path <path><file name>.xml, replacing <path> with the path you want the file to be saved in and <file name> with the name you want the .xml file to saved with. The final command will be something like export-startlayout –path \\FileServer\StartMenuLayouts\Layout1xml. When selecting the path for the file to be saved in, make sure that the path you choose can be accessed by all of the computers on the network.
Once you have exported the layout to an .xml file, you can move onto actually applying it to all of the computers on the network using Group Policy. To do so, first open the Start Menu, type edit group policy into the Search box and click on the program named edit group policy.
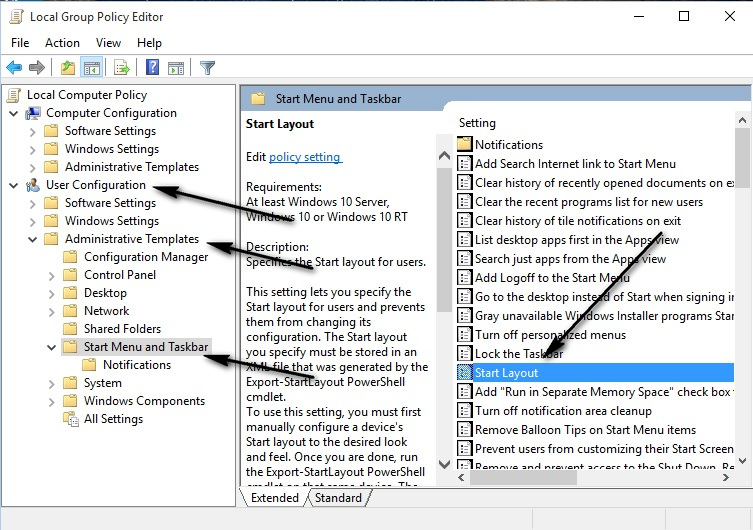
In the left pane, expand User Configuration or Computer Configuration.
Expand Administrative Templates and then click on Start Menu and Taskbar.
In the right pane under Settings, right click on Start Layout and click on Edit.
When the Start Layout policy settings show up, click on Enabled to apply the Start Menu layout through Group Policy and then paste the path (which should be accessible to all users on the network) where the .xml file for your Start Menu layout is stored under Start Layout File.
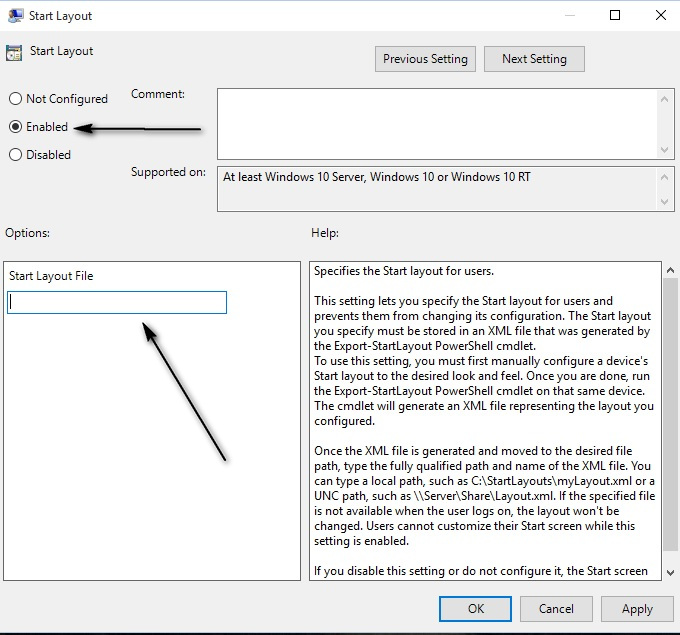
Click on Apply and then click on OK, and the Start Menu layout you have created will be applied to all users on the network.

If you wish to update the Start Menu layout you have created at any time, simply create a new layout and replace the old .xml file with a newer, updated .xml file using the export-startlayout command in Windows PowerShell. Once you do so, Group Policy will import and apply the updated Start Menu layout the next time any of the users of the domain log on.
Comments
Post a Comment