This problem usually occurs to users who are using Outlook Web Access (OWA) in Internet Explorer on a Windows PC. It’s an email client and users are annoyed since they can’t open emails or download attachments because of this major problem.

The error is available on almost all versions of Windows, including Windows 7, 8, and 10. Official methods for resolving the problem are either unhelpful or too general but there have been users who have been able to resolve the problem using their own methods. We have gathered those solutions and put them together in an article for you to check out.
What Causes the “The content can’t be displayed because the S/MIME control isn’t available” Error?
The list of possible causes is pretty much well-known and users have used the causes to determine the right steps they needed to undertake in order to resolve the problem. Check out the list below in order to point out your scenario and use the proper method to resolve the problem.
- S/MIME doesn’t recognize Internet Explorer 11 as a browser – This scenario usually occurs after an update and it can be resolved simply by adding the OWA page to Trusted Sites or to Compatibility View.
- S/MIME is not installed properly – If it’s not installed at all or if there is something wrong with its installation, make sure you install it properly.
- S/MIME is lacking administrator permissions for Internet Explorer to run – Some of its functions may fail to work properly unless Internet Explorer runs as an administrator
Solution 1: Add Your OWA Page in Trusted Sites and Use Compatibility View
This is one of the most successful methods you can use in order to resolve the problem. Adding a page into Trusted Sites in Internet Explorer will circumvent some issues and Compatibility View can make it more compatible with various versions of both Internet Explorer and OWA. Make sure you perform both steps of this method in order to resolve the problem!
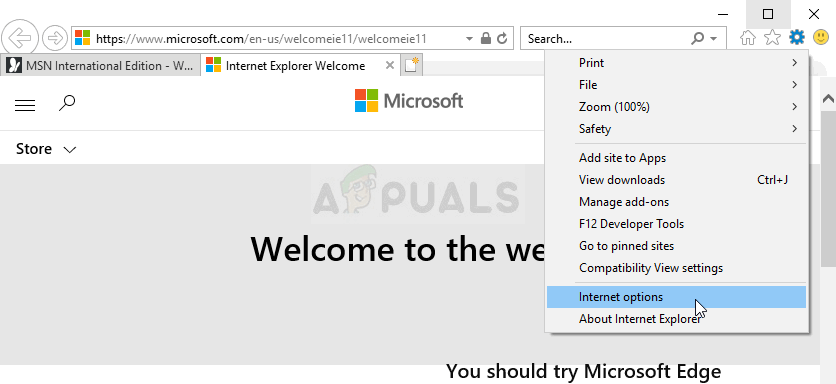
- Open Internet Explorer by searching for it in the Start menu or by locating it on your PC and click the cog icon located in the top right corner in order to access the drop-down menu.
- From the menu which opens, click on Internet options and wait for the window to open.
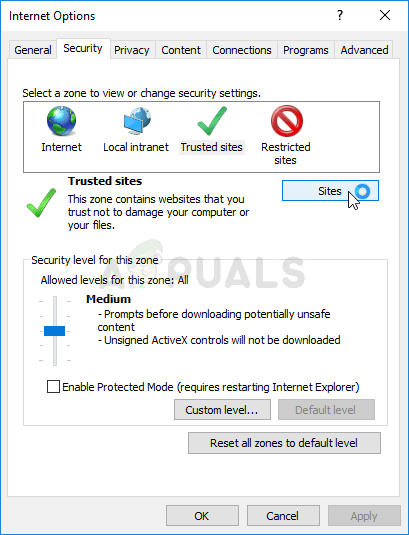
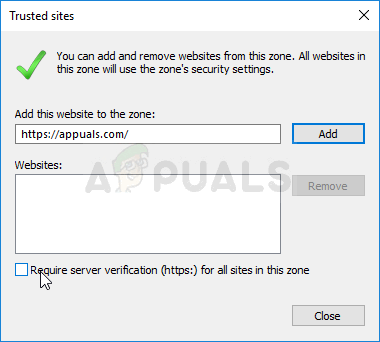
- Navigate to the Security tab and click on Trusted Sites >> Sites. Paste the link to your OWA page and click the Add option. Make sure you include the correct link.
- After you add the site, make sure you disable the Require server verification option (https) for all sites in this zone option under the Websites part.
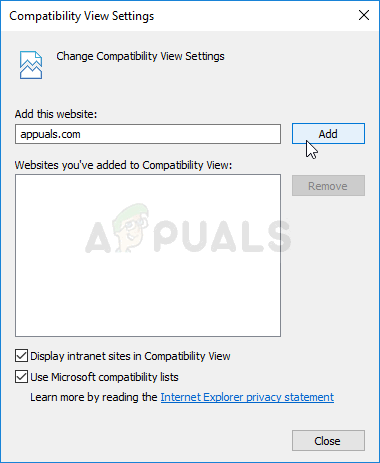
- After that, head back to the home page of Internet Explorer and click the cog icon located in the top right corner in order to access the drop-down menu. From the menu which opens, click on Compatibility View Settings and wait for the window to open.
- Under the Add this website entry, paste the same link you pasted in the steps above and click the Addbutton right next to the box. Click the Close button afterward.
- Check to see if the problem still appears when trying to access mails in OWA.
Solution 2: Install S/MIME
If you haven’t installed S/MIME in the first place, you can’t expect it to work. Also, if you have recently performed updates to your operating system, it’s quite possible that the update reset some settings or even broke the installation so it’s good to perform the process again by following the steps below!
- Open your OWA client and log into it. Once you are fully logged in, click the Options button at the top right part of the window and click the See All Options… button from the drop-down menu.
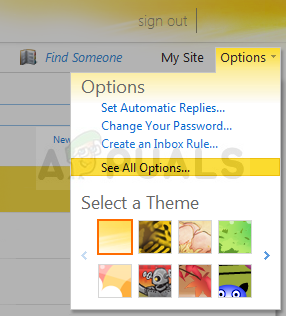
- After the Options window opens, click the Settings option in the left-hand pane. Click the S/MIME tab from the menu which will appear and check the hyperlink with the Download the S/MIME control
- Clicking the link will open a browser window and a download should start or you might be prompted with the option to Run or Save the file. Either way, make sure you run it after the download is over.
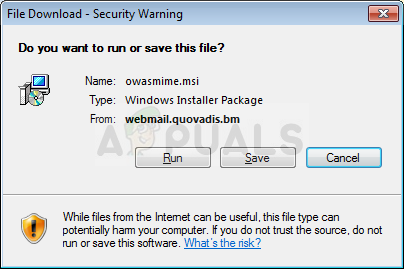
- Follow the instructions on-screen and it should install in no time. Refresh your browser and you should see a yellow bar pop up at the top of the webpage saying “This website wants to run the following add-on”. Right-click on it and choose Run Add-on on All websites from the dropdown menu.
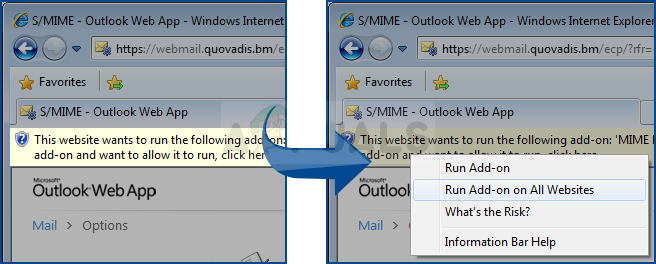
- An Internet Explorer – Security Warning window will appear so make sure you click the Run Check to see if the problem still appears when managing emails.
Solution 3: Run Internet Explorer as an Administrator
Installing S/MIME to use alongside Internet Explorer sometimes requires that you possess administrative permissions over the browser. You won’t be able to perform this method if you don’t actually have admin rights on the computer. Running the browser as an admin shouldn’t have negative consequences.
- Locate the iexplore.exe file on your computer by opening File Explorer and navigating to C:\Program Files\internet explorer. Open its properties it by right-clicking its entry either on the Desktop or the Start menu or the Search results window and choose Properties from the pop-up context menu.
- Navigate to the Compatibility tab in the Properties window and check the box next to the Run this program as an administrator option before saving the changes by clicking OK or Apply.
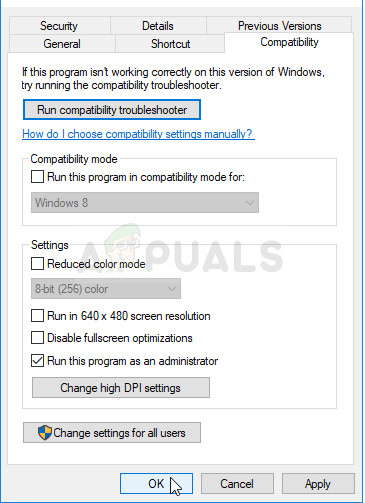
- Make sure you confirm any dialogs which may appear which should prompt you to confirm the choice with admin privileges and Internet Explorer should launch with admin privileges from the next startup. Check to see if the problem still appears afterwards.
Solution 4: Deselect a Checkbox in Internet Options
There is an option inside Internet Explorer >> Internet Options which has caused problems to OWA users regarding the use of S/MIME. Deselecting it has managed to help some users. It’s quite easy to do this so make sure you don’t give up troubleshooting before trying out this final method!
- Open Internet Explorer by searching for it in the Start menu or by locating it on your PC and click the cog icon located in the top right corner in order to access the drop-down menu.
- From the menu which opens, click on Internet options and wait for the window to open.

- Navigate to the Advanced tab and scroll inside the Settings window until you reach the list of Security-related options. Make sure you clear the checkbox next to the Do not save encrypted pages to disk option!
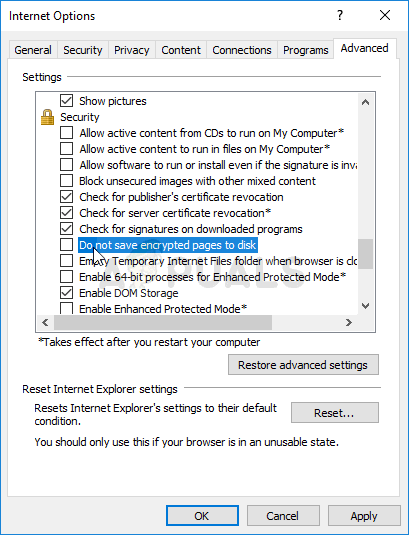
- Make sure you Apply the changes you made and restart your computer before you check to see if the problem still appears.
Comments
Post a Comment