Hardware defects and issues aren’t the only things that can cause a computer running on the Windows Operating System to fail to start up properly. Software issues – everything from corrupt Windows startup files to invalid boot files – can also cause a computer to fail at startup. This is where Startup Repair comes in. Startup Repair is a tool developed by Microsoft designed to detect any issues with the files and software in general that a computer needs to have in order to correctly boot into Windows and fix them. Startup Repair is available for all versions of the Windows Operating System starting from Windows XP.
On Windows 8, 8.1 and 10, there are three distinctly different ways using which you can perform a Startup Repair on your computer. The following are the three methods that you can use to perform a Startup Repair in Windows 8, 8.1 and 10:
How to BOOT into BIOS to change Boot Order
You must know how to boot and change boot order since this will be needed to perform the solutions below.Restart your computer. Enter your computer’s BIOS (or UEFI) settings as soon as it starts up. The key that you need to press to enter these settings depends on the manufacturer of your computer’s motherboard and can be anything from Esc, Delete or F2 to F8, F10 or F12, usually F2. This is displayed on the post screen, and the manual that was supplied with your system. A quick google search asking “how to enter bios” followed by model number will also list results. Navigate to the Boot.
Method 1: Perform a Startup Repair from the Startup Options screen
Almost every single computer that comes with Windows 8, 8.1 and 10 has a horde of recovery and restoration utilities built into its Operating System, and Startup Repair happens to be one of these tools. On such a computer, you can easily access and perform a Startup Repair from the Startup Options screen which can be accessed quite easily. However, it should be noted that you can only perform a Startup Repair using this option if you can manage to sign into Windows or at least get to the Windows login prompt (this is the screen on which you sign into your account).
To access the Startup Options screen, click on the Power button and then, while holding down the Shift key, click on Restart.
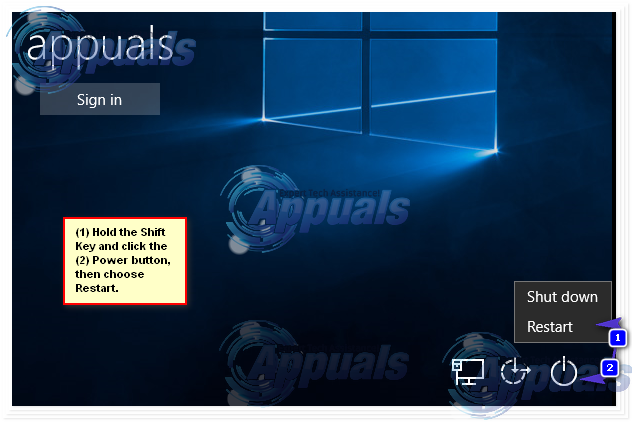
When your computer boots up, you will be at the Startup Options screen. Once you are at this screen, click on Troubleshoot.
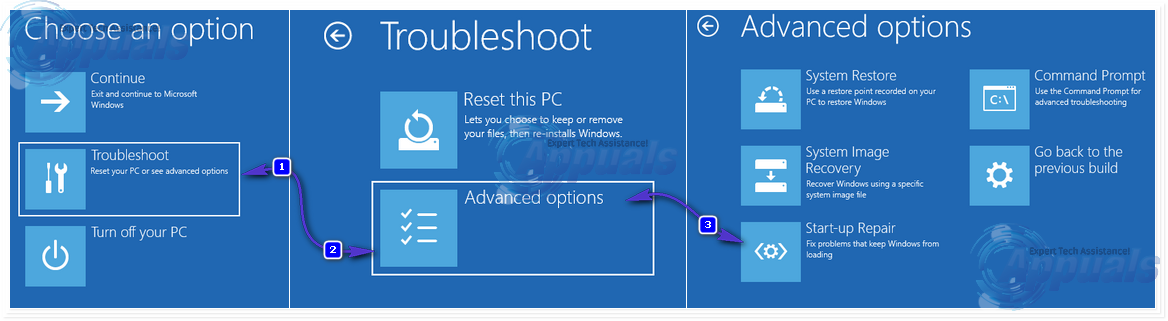
Click on Advanced options. Click on Automatic Repair (it may also be displayed as Startup Repair or Start-up repair). If prompted to do so, choose the Operating System you want to perform the Startup Repair on. If prompted to do so, select an account that is an Administrator.
Enter the password for the account you selected and click on Continue. The Startup Repair process will now begin. If you are asked to do something or make a choice, do so. If the computer needs to be restarted, restart it.
Once the process has been completed, you will be informed of whether or not any problems were detected and whether or not the detected problems were fixed by Startup Repair.
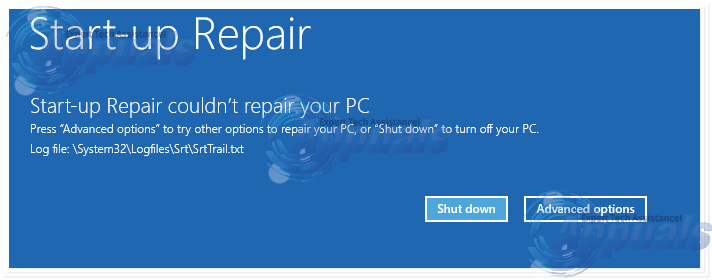
Method 2: Perform a Startup Repair using installation media
You can also perform a Startup Repair in Windows 8, 8.1 or 10 using an installation disc or installation USB. To do so, you need to: Insert the Windows installation disc or USB into the affected computer and restart it. If you don’t have one, you can create it using Rufus or the Media Creation Tool. As soon as the computer starts booting up, get into its BIOS settings (the instructions for which vary depending on the manufacturer of the computer’s motherboard), usually F2 key needs to be pressed when the first screen appears before the logo and configure the computer’s boot order from the boot tab to boot from the installation media instead of the hard drive.
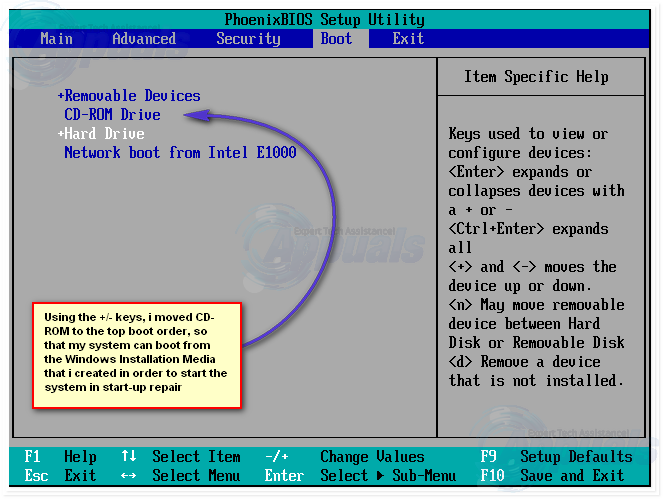
Save the changes and exit the BIOS settings. If prompted to do so, press any key to boot from the installation media. Select your language, time zone and keyboard layout preferences and then click on Next. When you reach a window with an Install now button at its center, look for and click on Repair your computer in the bottom left corner of the window.
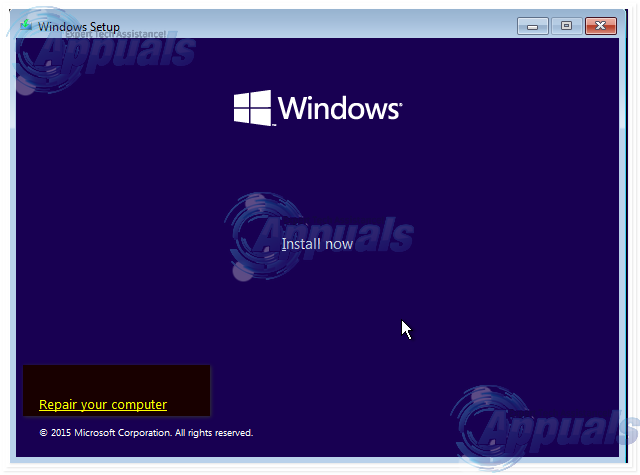
You will now arrive at the Startup Options screen. Once you are here, you need to:
Click on Troubleshoot > Advanced options. Click on Automatic Repair (it may also be displayed as Startup Repair or Start-up repair).
If prompted to do so, choose the Operating System you want to perform the Startup Repair on. If prompted to do so, select an account that is an Administrator. Enter the password for the account you selected and click on Continue.
The Startup Repair process will now begin. If you are asked to do something or make a choice, do so. If the computer needs to be restarted, restart it.
Once the process has been completed, you will be informed of whether or not any problems were detected and whether or not the detected problems were fixed by Startup Repair.
Method 3: Perform a Startup Repair using a system repair disc
A Startup Repair can also be performed using a system repair disc that you created for your computer beforehand or one that you created using a computer that is in working condition and is running on the same version of the Windows OS as yours. To perform a Startup Repair using a system repair disc in Windows 8, 8.1 or 10, you need to:
Insert the system repair disc into the computer and restart it.
As soon as the computer starts booting up, get into its BIOS settings (the instructions for which vary depending on the manufacturer of the computer’s motherboard) and configure the computer’s boot order to boot from the system repair disc instead of the hard drive.
Save the changes and exit the BIOS settings.
If prompted to do so, press any key to boot from the system repair disc.
If a list of keyboard language layouts is displayed, click on the one you prefer.
Once you do so, you will arrive at the Startup Options screen.
At the Startup Options screen, you need to:
Click on Troubleshoot > Advanced options.
Click on Automatic Repair (it may also be displayed as Startup Repair or Start-up repair).
If prompted to do so, choose the Operating System you want to perform the Startup Repair on.
If prompted to do so, select an account that is an Administrator.
Enter the password for the account you selected and click on Continue.
The Startup Repair process will now begin. If you are asked to do something or make a choice, do so. If the computer needs to be restarted, restart it.
Once the process has been completed, you will be informed of whether or not any problems were detected and whether or not the detected problems were fixed by Startup Repair.
Comments
Post a Comment